
Contributing guide#
NeuroKit2 welcomes everyone to contribute to code, documentation, testing and suggestions.
This package aims at being beginner-friendly. And if you’re not yet familiar with how open-source contributions work, or with how to use GitHub, this guide is for you!
Tip
Contributions come in many forms, not necessarily code. It can be answering to issues to help others, creating content (youtube videos, tweets, tiktoks…), tipping in a bit of money, or even just sharing ideas about the development of the package.
Why contribute to NeuroKit?#
Contributing is the best way to learn programming, to meet new people, to grow your professional network, to get known in the game and to have a lot of fun. But street cred only is often not enough, and it’s particularly important for young academics and students to get some “legit” rewards. We are fully aware of that. As such, we are committed to crediting and rewarding contributors to the best of our abilities.
For instance, authors of significant contributions (features, tough bug fixes etc.) will be listed as official Contributors section of our website. Additionally, frequent contributors that also get involved in general maintaining (e.g,participating in issues, fixing stuff, reviewing PRs, writing docs etc.) might be included in as package maintainers, in which case they’ll be expected to be more generally involved in the general development direction. Finally, we expect this project (the development of the package per se and all of the discussions/experiments that are around it) to result in several publications (could be about some features of the package, but also some tutorial papers, validation studies or whatnot. Obviously, people that contributed and allowed for a paper to be written will be included as authors.
Tip
On top of this, you can add that you are a contributor of NeuroKit to your CV. Since many labs and companies use it, they might be particularly interested in recruiting someone that has a good understanding of NeuroKit, and demonstrated skills in Python and software development.
Long story short, we want this project to be helpful to you, whether you’re a user, a contributor, or anything else in between :) And as always, do not hesitate to ask us if you have any questions.
NeuroKit’s style#
Note
If you feel overwhelmed by all the “requirements” so that it drives you away from contributing, please keep in mind that you can always open a PR with whatever you have, and then step by step we will help you making it up-to-standards.
Structure and code#
The NeuroKit package is organized into submodules, such as ecg, signal, statistics, etc. New functions should be created within at the appropriate places.
The API (the functions) should be consistent, with functions starting with a prefix (plot_, ecg_, eda_, etc.) so that the user can easily find them by typing the “intuitive” prefix.
Authors of code contribution are invited to follow the PEP 8 style sheet to write some nice (and readable) python.
That being said, human readability should always be favoured over anything else. Ideally, we would like the code in NeuroKit to be understandable even by non-programmers.
We prefer some nicely nested loops, rather than complex one-liners:
["that" for s if h in i for t in range("don't") if "understand" is False].The maximum line length is 100 characters.
Please document and comment your code, so that the purpose of each step (or code line) is stated in a clear and understandable way.
Don’t forget to add tests and documentation (a description, examples, etc.) to your functions.
Naming conventions#
We like consistency for the names of functions and arguments.
Also, when you create a new branch, consider naming it with a pattern corresponding to the content of your additions. For instance, fix_this_bug, add_that, add_info_on_this, changed_default_arg, make_function_faster. Likewise, when you make a pull request (PR), name it accordingly with the main type between brackets, example:
[Fix]bug fix etc.[Feature]new feature or function.[Docs]typos, documentation and new articles.[Change]changes in args, names, functions etc (often breaking changes).[Improvement]refining of code, efficiency improvements etc.[Maintenance]updating CI/CD or other maintainer related change
Setting up your environment#
We use a development script, dev.py, to simplify environment setup. While you can use standard Python, we strongly recommend using uv for faster and more reliable dependency management.
Beyond speed, uv can automatically manage Python versions for you. If you want to test your code updates against different supported python versions, uv will download and use it automatically without interfering with your global settings.
Method 1: Using uv (Recommended)
# Clone and enter the repository
git clone https://github.com/neuropsychology/NeuroKit
cd NeuroKit

# Setup environment and git hooks
uv sync --all-groups --all-extras
uv run pre-commit install
Method 2: Using pip
git clone https://github.com/neuropsychology/NeuroKit
cd NeuroKit

# Create and activate a virtual environment
python -m venv .venv
source .venv/bin/activate  # On Windows: .venv\Scripts\activate

# Install package and hooks
pip install -e ".[dev]"
pre-commit install
Tip
You can also simply run python dev.py setup. This script automatically detects if you have uv (default) or pip and configures the environment for you.
Integrations with an IDE (VSCode / VSCodium)#
To ensure linting and autocompletion work correctly, point your editor to the project’s virtual environment:
Open the NeuroKit folder in VSCode.
Open the Command Palette (
Ctrl+Shift+P).Search for “Python: Select Interpreter”.
Select the interpreter located within the
.venvfolder.
Development CLI (dev.py)#
Instead of remembering complex flags, use the dev.py script for common development tasks.
Command |
Description |
|---|---|
|
Install dependencies and git hooks automatically. |
|
Run the test suite via pytest. |
|
Check code style and errors using Ruff. |
|
Check code formatting violations using Ruff. |
|
Build the HTML documentation. |
|
Preview the documentation at http://localhost:8000. |
|
Remove documentation build artifacts. |
Pre-commit Hooks (Automatic Formatting)#
The easiest way to contribute clean code is to let the automated hooks handle it. When you run the setup command, pre-commit hooks are installed in your local repository.
Every time you run git commit, the hooks automatically run Ruff (our linter and formatter) only on the files you changed.
Automatic Fixes: If the hooks find minor issues (like improper spacing or unsorted imports), they will fix them automatically.
The “Fail-to-Fix” Loop: If a hook fixes something, the commit will be blocked. Don’t worry! This is normal. Simply “stage” the changes the hook just made (
git add .) and commit again.Why we do this: This ensures that we gradually improve the code style of the repository without creating massive, unrelated changes in your Pull Request.
Code Quality & Health Checks#
The dev.py script is intended for checking the status of the repository. Unlike the pre-commit hooks, these commands do not modify your code; they simply report its current state.
To check if the entire repository complies with our linting and formatting rules, use:
# Check for linting errors/logic issues across the repo
python dev.py lint

# Check if files are correctly formatted
python dev.py format
If these commands report errors in your modified files, please rely on the pre-commit workflow to resolve them. Simply staging your files (git add) and attempting a commit will allow the hooks to fix the issues automatically. We discourage manual global formatting to keep Pull Requests focused and small.
Tip
These global commands are “read-only” to prevent accidental, massive reformatting of the entire library. We prefer small, targeted Pull Requests that only change the files relevant to your feature or bug fix.
Running Tests#
Before pushing changes, verify that the package still works as expected:
python dev.py test
If you are using uv, you can also run uv run pytest. Ensure all tests pass (indicated by green text) before submitting your contribution.
Documentation Builder#
If you have modified docstrings or created new tutorials, build the documentation locally to preview the results:
Build:
python dev.py docsView:
python dev.py docs-serve(Access via your browser at localhost:8000)Clean: If you encounter build errors or stale files, run
python dev.py docs-clean.
Development workflow#
The NeuroKit GitHub repository has two main branches, master (the stable “official” version) and dev. The typical workflow is to work and make changes on the dev branch. This dev branch has a pull request (PR) opened (dev -> master) to track individual commits (changes). And every now and then (when a sufficient number of changes have been made), the dev branch is merged into master, leading to an update of the version number and an upload to PyPI.
The important thing is that you should not directly make changes on the master branch, because master is usually behind dev (which means for instance, maybe the the things you are changing on master have already been changed on dev). The master should be a stable, tested branch, and dev is the place to experiment.
This is a summary of the typical workflow for contributing using GitHub (a detailed guide is available below):
Download GitHub Desktop and follow the small tutorial that it proposes.
Fork the NeuroKit repository (this can be done on the GitHub website page by clicking on the Fork button), and clone it using GitHub Desktop to your local computer (it will copy over the whole repo from GitHub to your local machine).
In GitHub Desktop, switch to the dev branch. You are now on the dev branch (of your own fork).
From there, create a new branch, called for example “bugfix-functionX” or “feature-readEEG” or “typofix”.
Make some changes and push them (this will update your fork).
Create a pull request (PR) from your fork to the “origin” (the original repo) dev branch.
This will trigger automated checks that you can explore and fix.
Wait til we review it and merge into dev, and later see it being merged into master.
Tip
Some useful links: * Understanding the GitHub flow * How to create a Pull Request * Why and How to Contribute
Understanding NeuroKit#
Let’s start by reviewing some basic coding principles that might help you get familiar with NeuroKit
If you are reading this, it could be because you don’t feel comfortable enough with Python and NeuroKit (yet), and you impatiently want to get to know it in order to start looking at your data.
“Tous les chemins mènent à Rome” (all roads lead to Rome)
Let me start by saying that there are multiple ways you’ll be able to access the documentation in order to get to know different functions, follow examples and other tutorials. So keep in mind that you will eventually find your own workflow, and that these tricks are shared simply to help you get to know your options.
1. Documentation website#
You probably already saw the README file that shows up on NeuroKit’s Github home page (right after the list of directories). It contains a brief overview of the project, some examples and figures. But, most importantly, there are the links that will take you to the Documentation.
The documentation contains a description of the API (or Application Program Interface), which you can access from this page. All the info you will see on the webpages is rendered directly from the code, meaning that the website reads the code and generates a HTML page from it. That’s why it’s important to structure your code in a standard manner.
The API is organized by types of signals. You’ll find that each function has a description, and that most of them refer to peer-reviewed papers or other GitHub repositories. Also, for each function, parameters are described in order. Some of them will take many different options and all of them should be described as well.
If the options are not explained, they should be. It’s not your fault you don’t understand. That’s why we need you to contribute.
For instance, in the ECG section, the ecg_peaks function takes 4 parameters. One of them is method: each method refers to a peer-reviewed paper that published a peak detection algorithm. You can also see what the function returns and what type of data has been returned (integers and floating point numbers, strings, etc). Additionally, you can find related functions in the See also part. An small example of the function should also be found. You can copy paste it in your Python kernel, or in a Jupyter Notebook, to see what it does.
2. The source on Github#
Now that you’re familiar with the documentation website, let’s go back to the repo. What you have to keep in mind is that everything you saw in the previous section is in the Github repository. The website pages, the lines that you are currently reading, are stored in the repository, which is then automatically uploaded to the website.
Ready for inception? let’s try to find the location of the file you’re currently reading. Go under docs folder, where the documentation source lives.
As you can see, there are several sections on the website (see the Table of Content on the left, and we are in the resources section. So you might want to look into the resources subfolder… However, a surprise waits for you. The contributing.rst file that should contain the page that is on the website is actually almost empty! Well not really, because it imports (includes) another file located upstream.
How to use GitHub to contribute#
Note
You might notice that many people use, and many tutorials online are about using GitHub via the command line, by running obscure functions in your terminal. You absolutely don’t need to learn that! We use the desktop version of GitHub and it’s much easier.
Step 1: Fork the repo#
A fork is a copy of a repository. Working with the fork allows you to freely experiment with changes without affecting the original project.
Hit the Fork button in the top right corner of the page and in a few seconds, you will have a copy of the repository in your own GitHub account.

Now, that is the remote copy of the project. The next step is to make a local copy in your computer.
While you can explore Git to manage your Github developments, we recommend downloading Github Desktop instead. It makes the process way easier and more straightforward.
Step 2: Clone it#
Cloning allows you to make a local copy of any repositories on Github.
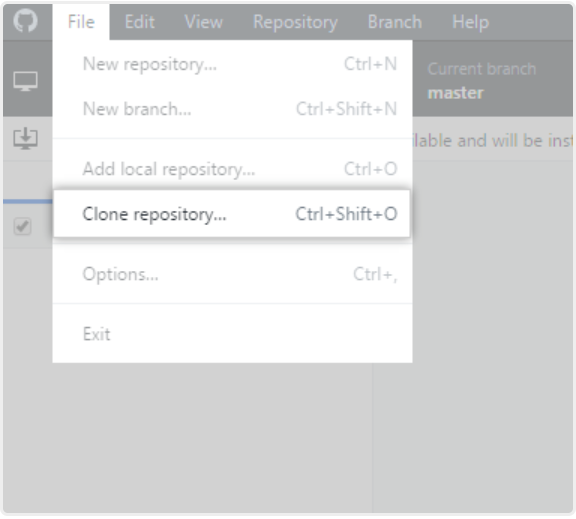
Go to File menu, click Clone Repository and since you have forked NeuroKit2, you should be able to find it easily under Your repositories.
Choose the local path of where you want to save your local copy and as simple as that, you have a working repository in your computer.
Step 3: Improve it#
And here is where the fun begins. You can start contributing by fixing a bug (or even a typo in the code) that has been annoying you. Or you can go to the issue section to hunt for issues that you can address.
For example, here, as I tried to run the example in ecg_fixpeaks() file, I ran into a bug! A typo error!
Fix it and hit the save button! That’s one contribution I made to the package!
To save the changes you made (e.g. the typo that was just fixed) to your local copy of the repository, the next step is to commit it.
Step 4: Commit it and push it#
In your Github Desktop, you will now find the changes that you made highlighted in red (removed) or green (added).
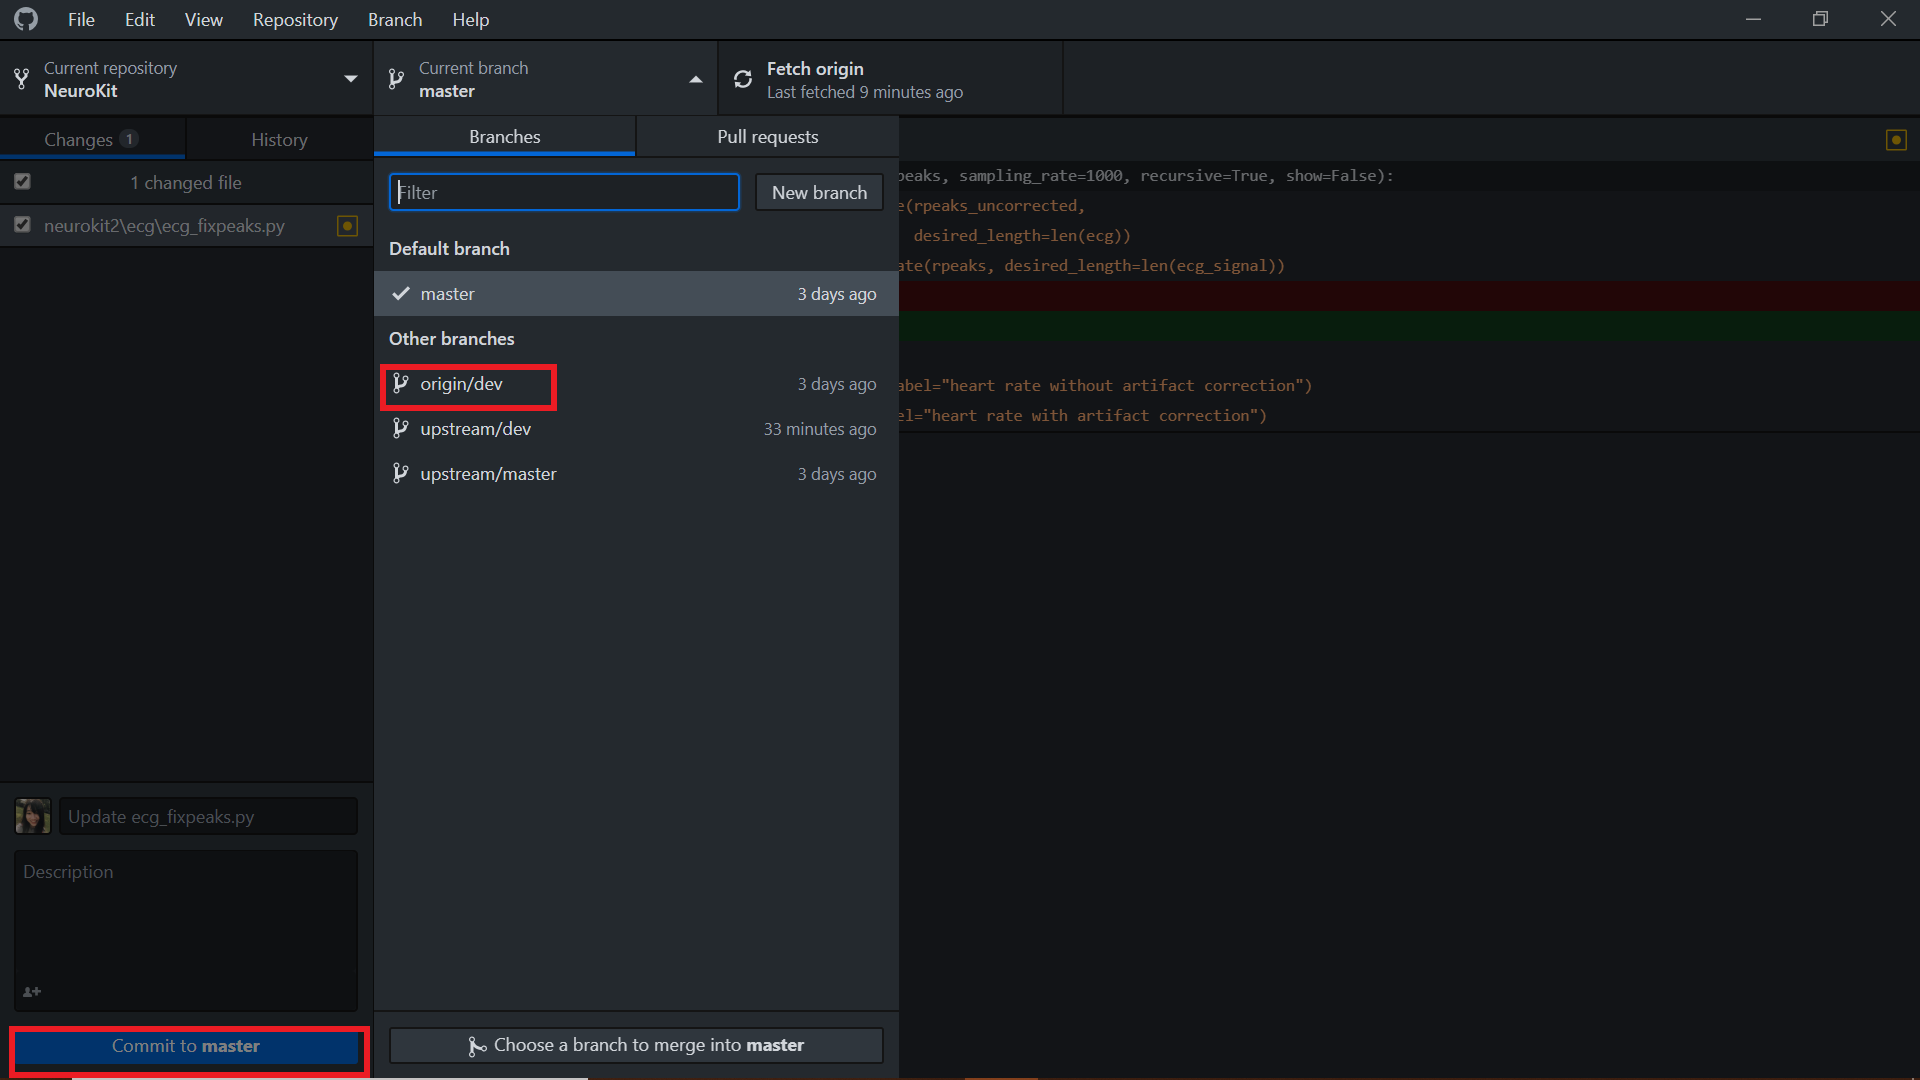
The first thing that you have to do is to switch from the default - Commit to Master to Commit to dev. Always commit to your dev branch as it is the branch with the latest changes. Then give the changes you made a good and succinct title and hit the Commit button.
Committing allows your changes to be saved in your local copy of the repository and in order to have the changes saved in your remote copy, you have to push the commit that you just made.
Step 4: Create pull request#
The last step to make your contribution official is to create a pull request.
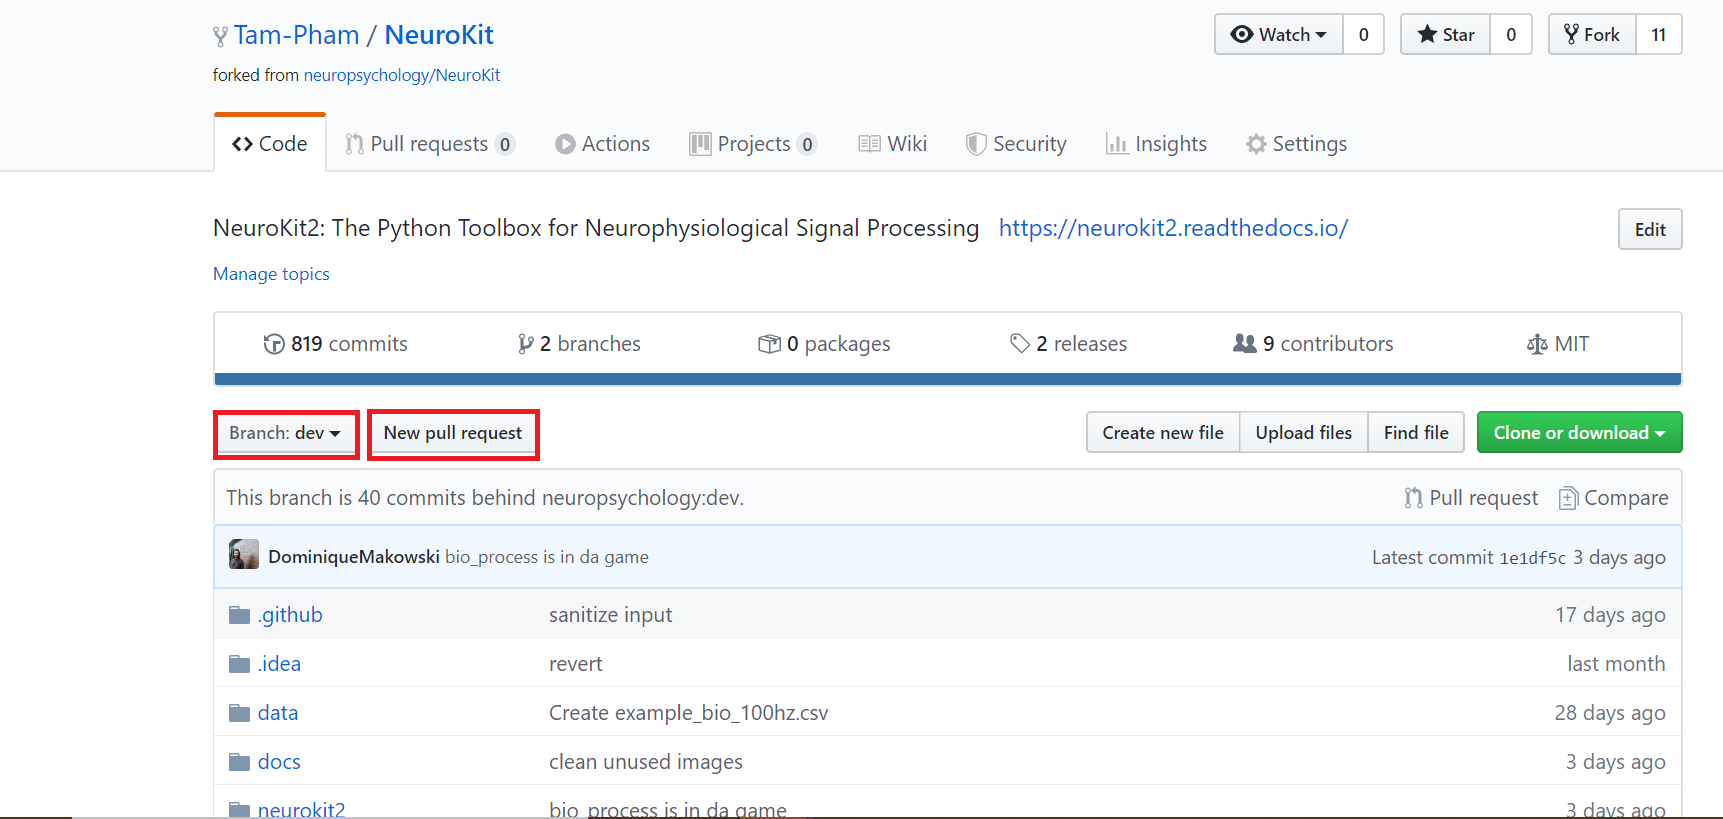
Go to your remote repository on Github page, the New Pull Request button is located right on top of the folders. Do remember to change your branch to dev since your commits were pushed to the dev branch previously.
And now, all that is left is for the maintainers of the package to review your work and they can either request additional changes or merge it to the original repository.
Step 5: Let’s do it#
Let’s do it for real! If you have a particular feature in mind that you would want to add, we would recommend first opening an issue to let us know, so we can eventually guide you and give you some advice. And if you don’t know where to start or what to do, read on. Good luck 💪
Ideas for contributions#
Now that you’re familiar with how to use GitHub, time to get your hands dirty and contribute to open-science. Not sure where to start or what to do?
In this guide, we will discuss the two best types of contributions for beginners, as they are easy to make, super useful and safe (you cannot break the package 😏).
Talk about it#
Contributing to the development of a package also means helping to popularize it, so that more people hear about it and use it. So do not hesitate to talk about it on social media (twitter, reddit, research gate, …) and present it to your students or colleagues. Also, do not hesitate to write blogposts about it (or even make some videos if you’re a YouTube influencer 😎). And let us know if you do that, we’ll try to boost your outreach by retweeting, sharing and spreading it.
Look for “good first contribution” issues#
If you know how to code a bit, you can check out the issues that have been flagged as good for first contribution. This means that they are issue or features ideas that we believe are accessible to beginners. If you’re interested, do not hesitate to comment on these issues to know more, have more info or ask for guidance! We’ll be really happy to help in any way we can ☺️.
Improving documentation#
One of the easiest thing is to improve, complete or fix the documentation for functions. For instance the ecg_simulate() function has a documentation with a general description, a description of the arguments, some example etc. As you’ve surely noticed, sometimes more details would be needed, some typos are present, or some references could be added.
The documentation for functions is located alongside the function definition (the code of the function). The code of the ecg_simulate() function is here. And as you can see, just below the function name, there is a big string (starting and ending with “””) containing the documentation.
This thing is called the docstring.
If you modify it here, then it will be updated automatically on the website!
Adding tests#
Tests are super important for programmers to make sure that the changes that we make at one location don’t create unexpected changes at another place.
Adding them is a good first issue for new contributors, as it takes little time, doesn’t require advanced programming skills and is a good occasion to discover functions and how they work.
By clicking on the “coverage” badge under the logo on the README page, then on the “neurokit2” folder button at the bottom, you can see the breakdown of testing coverage for each submodules (folders), and if you click on one of them, the coverage for each individual file/function (example here).
This percentage of coverage needs be improved ☺️
The common approach is to identify functions, methods or arguments that are not tested, and then try to write a small test to cover them (i.e., a small self-contained piece of code that will run through a given portion of code and which output is tested (e.g., assert x == 3) and depends on the correct functioning of that code), and then add this test to the appropriate testing file.
For instance, let’s imagine the following function:
In [1]: def domsfunction(x, method="great"):
   ...:     if method == "great":
   ...:          z = x + 3
   ...:     else:
   ...:          z = x + 4
   ...:     return z
   ...:
In order to test that function, I have to write some code that “runs through” it and put in a function which name starts with test_*, for instance:
In [2]: def test_domsfunction():
   ...:     output = domsfunction(1)
   ...:     assert output == 4
   ...:
This will go through the function, which default method is “great”, therefore adds 3 to the input (here 1), and so the result should be 4. And the test makes sure that it is 4. However, we also need to add a second test to cover the other method of the function (when method != “great”), for instance:
In [3]: def test_domsfunction():
   ...:     output = domsfunction(1)
   ...:     assert output == 4
   ...:

    # Test other method
I could have written assert output == 5, however, I decided instead to check the type of the output (whether it is an integer). That’s the thing with testing, it requires to be creative, but also in more complex cases, to be clever about what and how to test. But it’s an interesting challenge 😏
You can see examples of tests in the existing test files.
And if you want to deepen your understanding of the topic, check-out this very accessible pytest tutorial for data science.
Adding examples and tutorials#
The documentation that is on the website is automatically built by a GitHub action, from reStructured Text (RST) files (a syntax similar to markdown) or from jupyter notebooks (.ipynb) Notebooks are preferred if your example contains code and images.
These documentation files that we need to write are located in the /docs/ folder. For instance, if you want to add an example, you need to create a new file, for instance myexample.rst, in the docs/examples/ folder.
If you want to add images to an .rst file, best is to put them in the /docs/img/ folder and to reference their link.
However, in order for this file to be easily accessible from the website, you also need to add it to the table of content located in the index file (just add the name of the file without the extension).
Do not hesitate to ask for more info by creating an issue!